Butter Science for Kids! Edible STEM Activity.
Do you ever get that urge to be really do it yourself-y? Like you have a homestead or you are just making do with what you have?
Maybe you are just reading some Laura Ingalls Wilder and thinking, Could I do that? Or watching some period piece and wonder if you have what it takes?
I can tell you I’ve wondered what I could do from the homesteader times. It’s not much. But I could make butter.
And so can you.
Your kids will love this. Learn how to make butter and the science behind all the steps.
Let’s make some butter!

What's In This Post?
How To Make Butter with Kids
Making butter is actually pretty easy. (Though not as easy as just buying it from the store.) And it is a great activity to help kids burn off some energy while stuck indoors.
Supplies for Making Butter
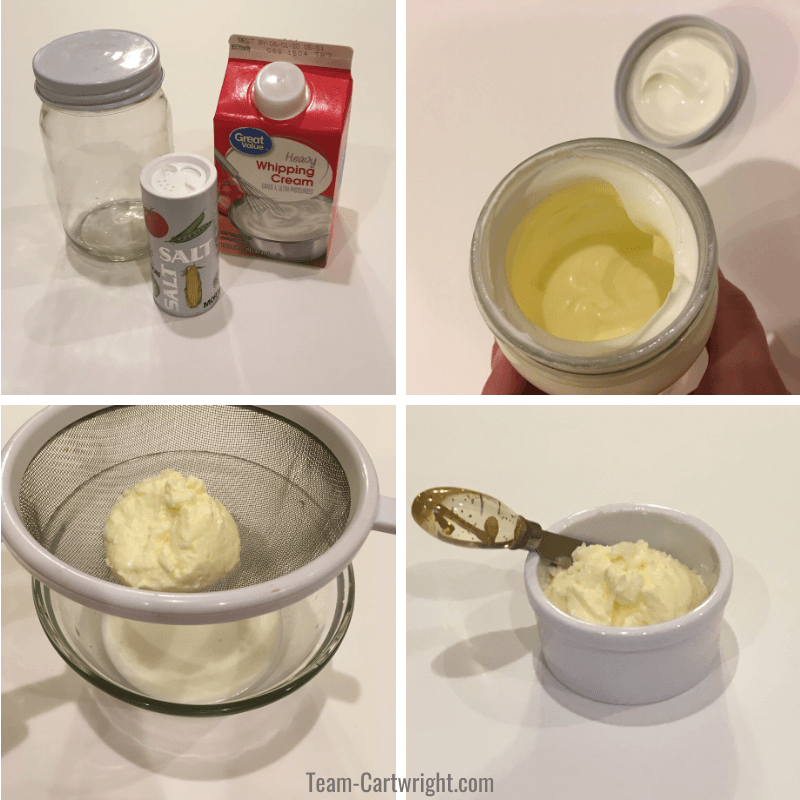
You really don’t need much to make butter. A few key items are all it takes.
You need:
- Heavy Whipping Cream
- Salt
- Strainer
- Jar with a Lid
How To Make Butter with Your Kids
This is the easiest recipe ever.
Step 1:
Pour some heavy whipping cream into your jar. That exact amount doesn’t matter. Aim for the jar to be about half full though. Make sure the lid is securely in place.
Step 2:
Hand the jar to your child and have them shake it. Hard and fast for as long as they can.
Then you get butter.
Okay, I’ll go into a bit more detail.
As you shake the jar you will hear the cream sloshing around. You will need to shake it for several minutes to get to butter, so it is a good idea to pass it around for everyone in your family to shake.
Eventually, you will hear the sloshing sound stop. You can take a peek inside and you will see you have made whipped cream! Your kids can taste it if you want. It won’t taste as good as normal whipped cream because there is no sugar or vanilla flavoring added, but the texture is right.
Close the jar again and keep shaking. Eventually, you will hear the liquid sounds start up again. You will see a mass start to form in your jar. This is the butter. Open your jar and sprinkle in some salt. (You can skip this step, but it makes it taste better.)
Shake for a little longer, then open up your jar.
Step 3:
Put a strainer over a bowl and pour the contents of the jar over the strainer.
The liquid is buttermilk. You can save that for any baking projects you might have.
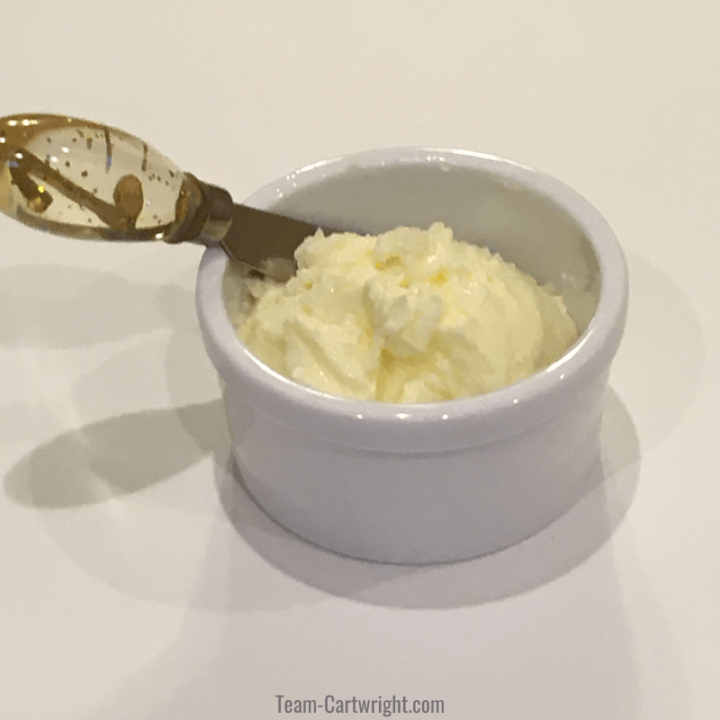
The solid is your butter. Rinse it gently in some cold water. Then put your butter in a dish or bowl and it is ready to use!
(For more edible fun check out these activities: Taste Safe Sensory Ideas for Kids)
A Few Hints:
The more vigorously you shake the jar the faster the process will take place. But if you shake more slowly it will still happen. It just takes a little longer.
If you let the cream come to room temperature before starting the experiment it will form butter faster. (It works straight from the fridge too though.)
It is okay to take breaks in the shaking, it won’t mess up your butter. Taking turns can be easier for little ones who might get tired from shaking.
If you opt not to add salt or only add a little the butter might not taste exactly like the kind you get from the store. You can still use your butter as a basic spread on bread, just sprinkle a little salt on top to get the flavor you are used to.
More Must Do Activities for Kids
The Science of Making Butter
So what is happening here?
The cream contains lots of fat molecules. When you shake the cream you are agitating the solution. This physically breaks down the lipoprotein membranes of the fat molecules. You aren’t performing a chemical change on the solution.
The more you shake the more the membranes break down and the fat molecules clump together. You also introduce a lot of air to the solution. The fat molecules starting to clump together around the air bubbles are how you get whipped cream.
As you keep shaking the fat molecules they clump more and more. Those bubbles start to pop and leak out what we call the buttermilk.
Eventually, you end up with the solid mass of fat molecules, which is our butter. The liquid has come out and is our buttermilk.

Chemical vs Physical Changes
In science we have chemical changes and physical changes.
Chemical Changes
Chemical changes take place when we alter the substances we started with on a molecular level. We chemically change them and end up with a different substance than we started with.
For example, burning something is a chemical change. If we burn a piece of wood we do not have that same wood at the end of the process.
A baking soda and vinegar reaction is a chemical change. We start with baking soda and vinegar and end up with water, carbon dioxide, and some additional ions.
Physical Changes
Physical changes are changes to a substance that don’t alter them on the molecular level. So changing states of matter for example. Water can go from ice to water to vapor, but it stays the same molecules. This is a physical change.
Changing the structure of an item by squishing it, ripping it, or chopping it into pieces is performing a physical change on the substance.
Making Butter
Making butter is a physical change. The fat and liquid components were always there, they are just being rearranged. The fats clump together during the shaking process, separating from the liquids. But they don’t change their main composition.
Making Butter with Kids
Thanks is the perfect project to get kids excited about both cooking and STEM. Happy churning!

How To Make Butter with Kids
Butter Science for Kids! Create an edible science experiment your kids will love.
Materials
- Heavy Whipping Cream
- Salt (optional)
Tools
- Jar with Lid
- Strainer
- Small Bowl
Instructions
- Fill your jar 1/3 to 1/2 full with heavy whipping cream. Close
tightly. - Start shaking your jar. In a few minutes, you will
hear the sloshing sound stop. - Peek into your jar. You
have made whipped cream at this point. Close jar again. - Continue shaking until you hear liquid sounds start again.
- Peek inside one more time. You will see a solid mass beginning to form. Sprinkle with salt if you want salted butter. Close jar.
- Shake for a few more minutes until you have a solid mass surrounded by liquid.
- Open your jar and pour over your strainer sitting on a bowl. The liquid is buttermilk. Use for future cooking or discard. The solid is the butter.
- Gently rinse your butter and place in a dish.
- Enjoy!
Notes
Tips:
This is a good activity to do with a couple of people. You can pass around the jar to shake. (This helps little ones when doing this activity.)
thara
Wednesday 3rd of June 2020
Great, thanks!