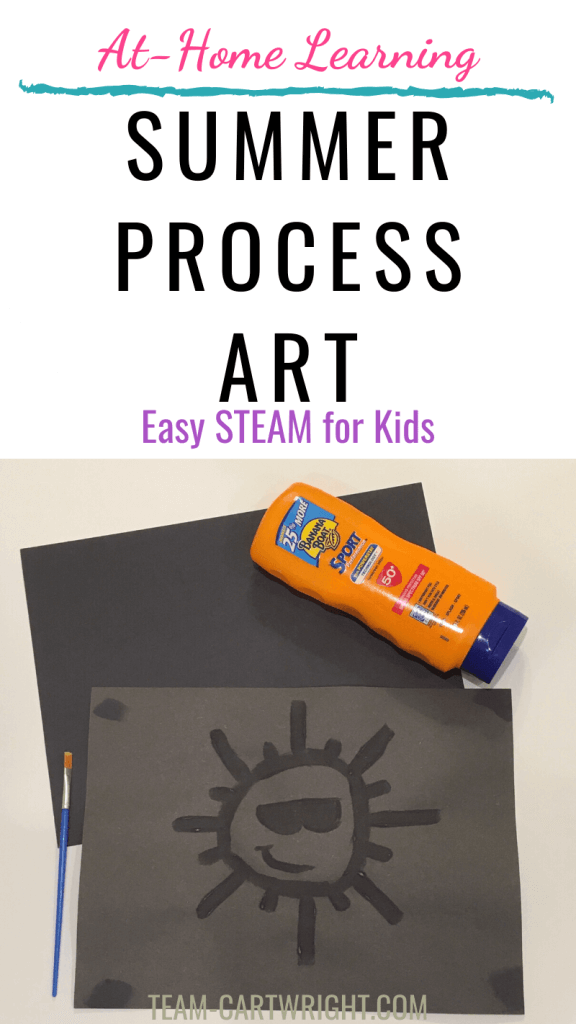
Paint-less watercolor process art for kids: The easiest art project you’ve ever done.
Confession time: As much as I love doing projects with my kids, sometimes I just do not want to do art. Okay, coloring, drawing, that’s fine. But painting or anything more complicated? No.
It isn’t that I don’t like art or think it isn’t important. I just don’t want to worry about the mess. Or take the effort to get out paint, water bowls, fill the paint pallets, find the brushes.
Yes, it is a bit lazy of me, but I can’t be the only one.
Fortunately, we found an easier way to ‘paint.’ Yes, it is kind of a cheater way. And no, it doesn’t use real paint. But the results were really good and the kids were happy.
Here is the easiest watercolor process art you have ever done.

What's In This Post?
Easy Watercolor Process Art
We initially did this activity because my kids wanted something different to try and I just did not want to try that hard. But it turned into a big hit. You don’t need many supplies, and you can make this as detailed or simple as you want. Either way, it looks pretty good.
Supplies for Watercolor Process Art
There are only a few things you need for this activity and they are easy to set up.
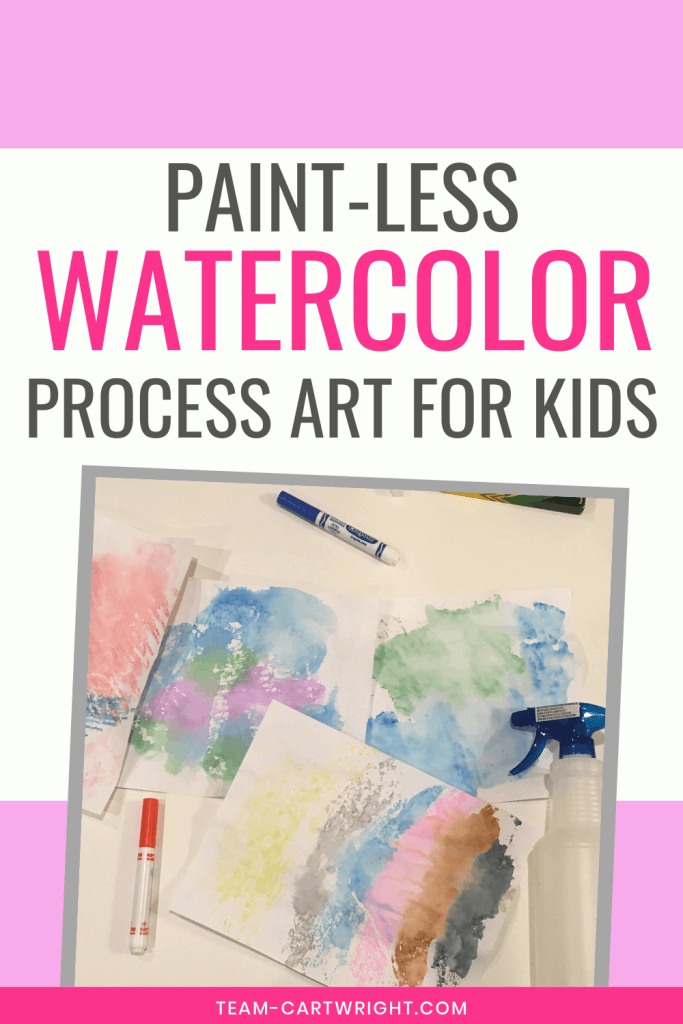
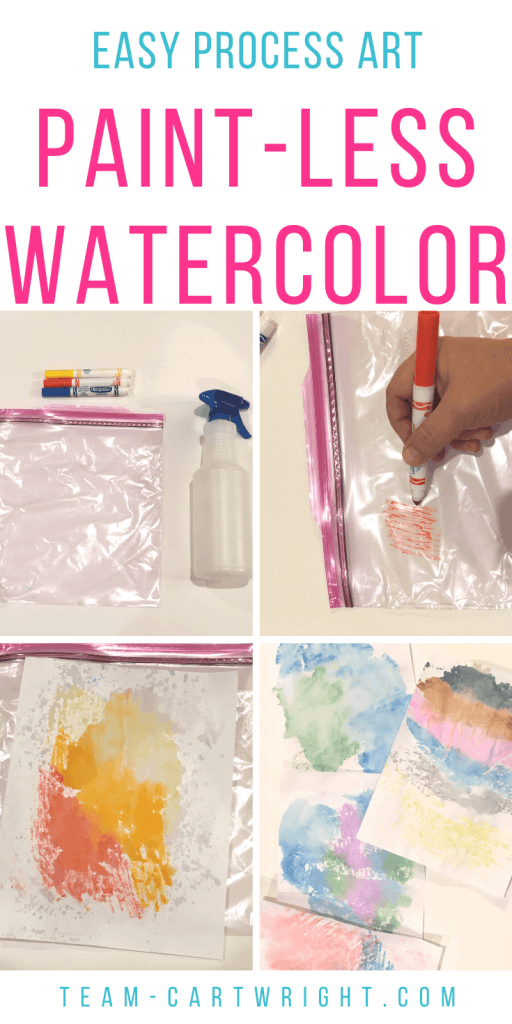
- Markers
- Blank Paper
- Large Resealable Baggie
- Squirt Bottle of Water
These are the basics you need. You can make adjustments or substitutions based on what you have handy. You can use small resealable baggies instead of large (and I think even wax paper might work.) Plus you can try this on construction paper if you want a colored background.
How To Make Your Paintless Watercolor Art for Kids
This is so easy to do.
Step 1:
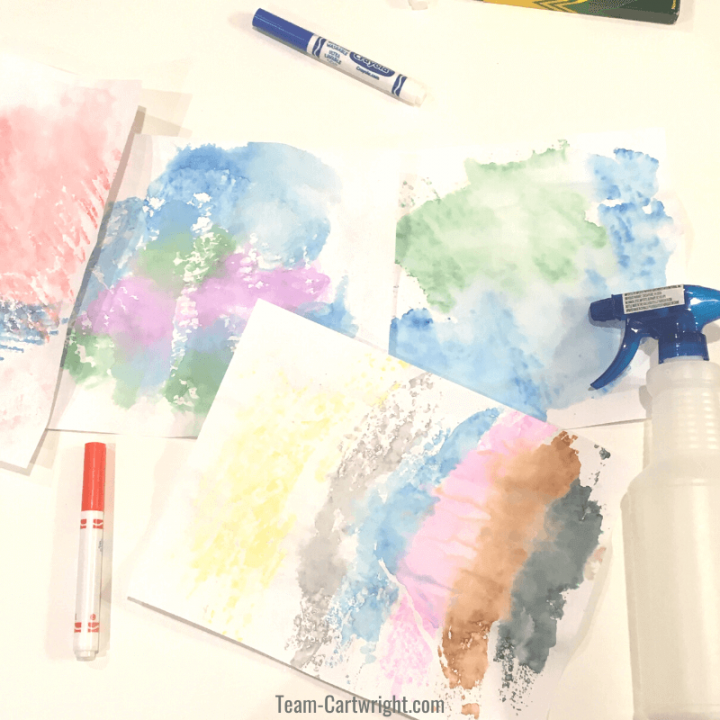
Give your child one of the large resealable baggies.
Have them color all over the bag. We are talking about drawing a nice little picture, this is the time to just scribble all over. You can try to make designs, but we found the more color the better, and the bigger the blocks of color the better.
It is fun to mix the colors or at least put them right next to each other so there will be some overlap later.
Step 2:
Take your squirt bottle and have your child squirt the entire baggie. The goal is to have a light mist over the whole bag, not giant puddles of water.
Step 3:
Take your blank piece of paper and place it on the baggie. Smooth it out so it gets damp and completely touches the surface of the baggie.
Step 4:
Gently peel the paper off the baggie and turn over to see your art!
Let your paper sit until dry. My kids called this making pretty paper!
Create More!
After you have transferred the ink to your paper, you can wipe down your baggie with a paper towel. Once the bag is dry, you can make more art!
Must Do Activities for Kids!
How To Use Your Pretty Paper
Once your watercolor art is finished you have a couple of options on how to proceed.
Make DIY Cards
This pretty paper is great for making homemade cards. You can fold it in half and write a nice message inside. This is a great way to take cards for family and friends up a level.
Add More Art
Once your watercolor is dry you can use it as paper for additional art. Take a marker and draw on it.
You can write motivational or inspirational quotes on this paper to create personalized wall art for your child’s room.
Unique Wrapping Paper
You can save this paper to create unique wrapping for gifts. This is actually a good way to recycle old art. Your kids get the experience and fun of making the art, but then it can be useful as gift wrap.
My kids are always excited to see other people take joy in their art, so this is an especially good idea for gifts for grandparents and other loved ones.
What’s Happening with this Project?
I can’t let an activity go without recognizing some of the learning opportunities taking place. And this process art project is no exception. (Learn why process art is so important by clicking here.)
So what happens when we draw on the baggie and spray it with water? There are two things that make this art project work.
One is that the ink in the markers is water-soluble. This means it can be dissolved in water, and that is what makes the markers washable.
Two is that the plastic of the baggie is not very absorbent, so the ink of the marker sits on top of it. Yes, it can dry and stay there. But it doesn’t get absorbed by the plastic. Paper, on the other hand, is pretty absorbent. So when the marker is moistened by the water it can be absorbed into the paper. (This is also how it spreads out on the paper and looks so cool.)
More Fun Projects You Have Got To Try!
Fine Motor Skills
This activity works fine motor skills. One way is the act of coloring. Holding markers and using them is great for tiny hand muscles. (Learn all the ways color helps kids learn: Why Kids Need to Color)
Using the spray bottle also builds hand muscles and works on motor skills. It takes practice to be able to hold the squirt bottle and have the strength to both aim and spray it.
Color Mixing
Any time we work with colors I encourage my kids to talk about color mixing. You can talk about the primary colors vs the secondary colors. (Remember your color mixing? Red+Blue=Purple, etc.)
This is a great way to get more into it than just the basic mixing though. What happens if you mix yellow and green? Or purple and orange? You can really let your kids explore the entire color wheel.
Ask your kids what they think they will see. Then check your paintless watercolor project and see what you got! This boosts more than just STEM skills, it works language skills as you discuss colors, mixing, and more.
(Get more fun color science activities here: Easy Color STEM for Kids)
Get Creative without Paint!
Overall this project is a great way to create art and ‘paint’ without using actual paint. It is easy and fast, but it held my kids’ attention for a long time. And we found all kinds of ways to use the art in other projects.
This is a process art project we will be doing again and again!

How To Make Paint-less Watercolor Art
Make beautiful watercolor art without the mess of actual paint! This easy process art project will wow your kids.
Materials
- Markers
- Large Resealable Baggies
- Water in a Squirt Bottle
- Paper
Instructions
This is a simple process, but your kids will want to make more and more art.
- Give your child a large resealable baggie and some markers.
- Have them color all over the baggie. The more color the better.
- Gently spray the baggie with water so it is evenly misted.
- Take a blank piece of paper and place it on the bag. Smooth it down so it covers all the water and marker.
- Gently pull up your paper and let it dry on a paper towel.
- Enjoy your watercolor!