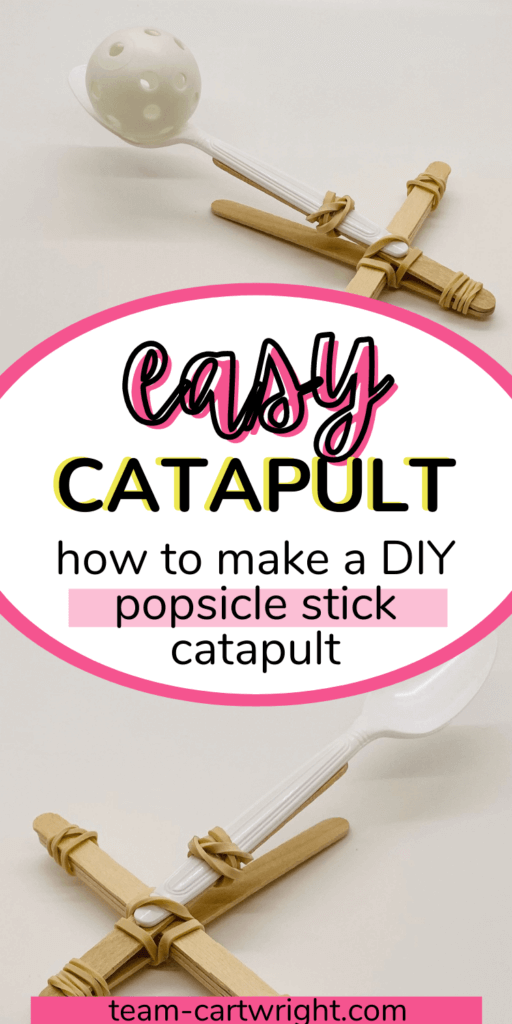
Popsicle Stick Catapult! How to make a DIY craft stick launcher STEM challenge for kids.
- Ages: Preschool, PreK, Kindergarten, Elementary
- Difficulty: Medium
- Learning: STEM, Engineering, Cause and Effect, Simple Machines
Popsicle sticks, craft sticks, whatever you want to call them, they both make something amazingly fun when you add in some rubber bands and a plastic spoon.
Catapults.
Yep, you only need a few simple items to make an awesome launcher that will wow your kids.
Not only is this a fun way to spend an afternoon, it challenges kids to think like engineers. They will need to build, problem solve, and test their launcher. This sort of catapult also demonstrates trajectories and introduces kids to fun physics concepts.
Let’s make a popsicle stick catapult.
What's In This Post?
Popsicle Stick Catapult
We originally did this activity a few years ago as a snowball shooter. (You can see it with other fun holiday activities: 5 Minute Christmas STEM Activities.) It is perfect for shooting ‘snowballs’ all winter long.
But a lot of people have told me how much they like it and wanted more information. And this is too much fun to leave for just the holidays. So here are the full directions and explanations for year-round fun! (Scroll to the bottom for free printable instructions!)
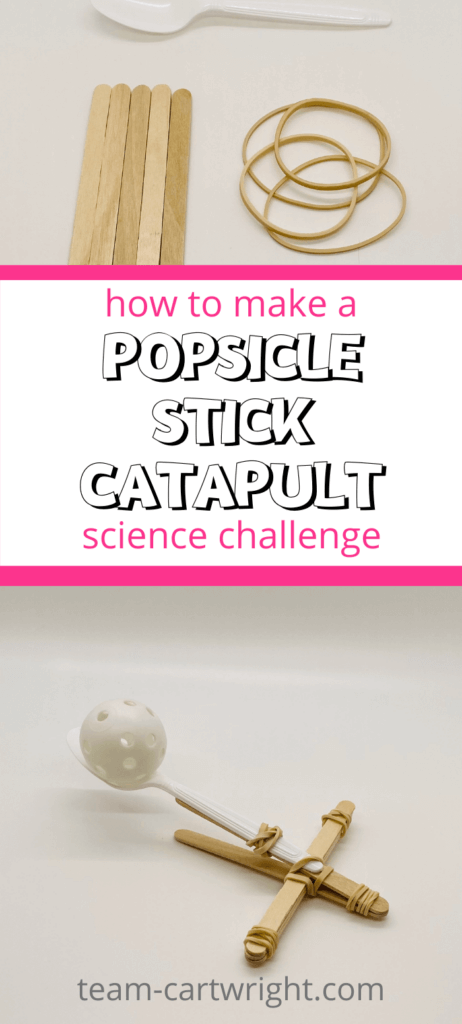
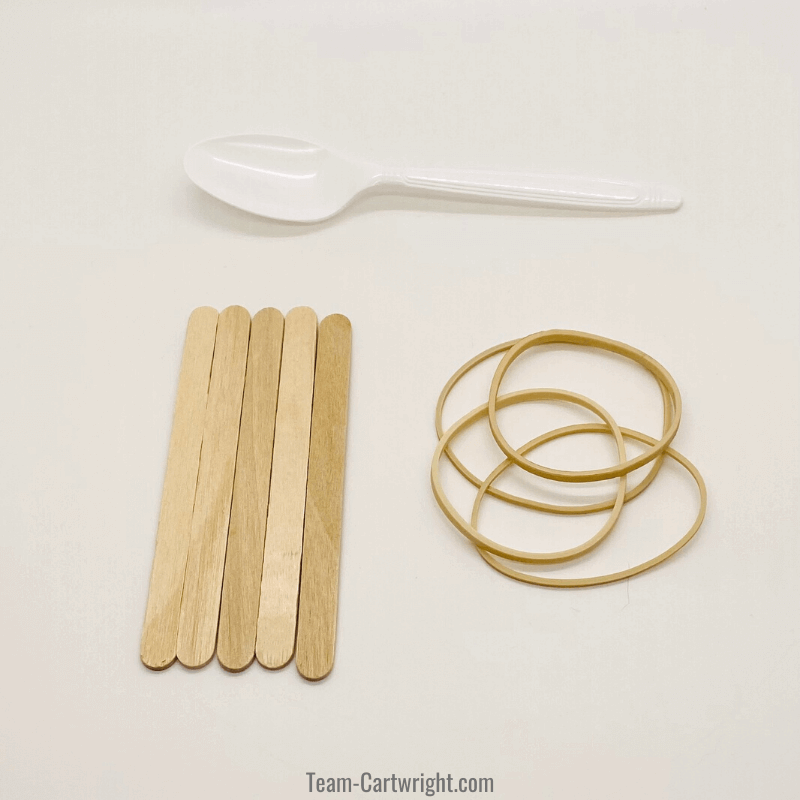
Craft Stick Catapult Supplies
You only need a few items to make these awesome DIY catapults. If you do crafts regularly you probably already have them in your supplies!
Here is what you need to gather up:
- 5 Craft Sticks or Popsicle Sticks
- Rubber Bands
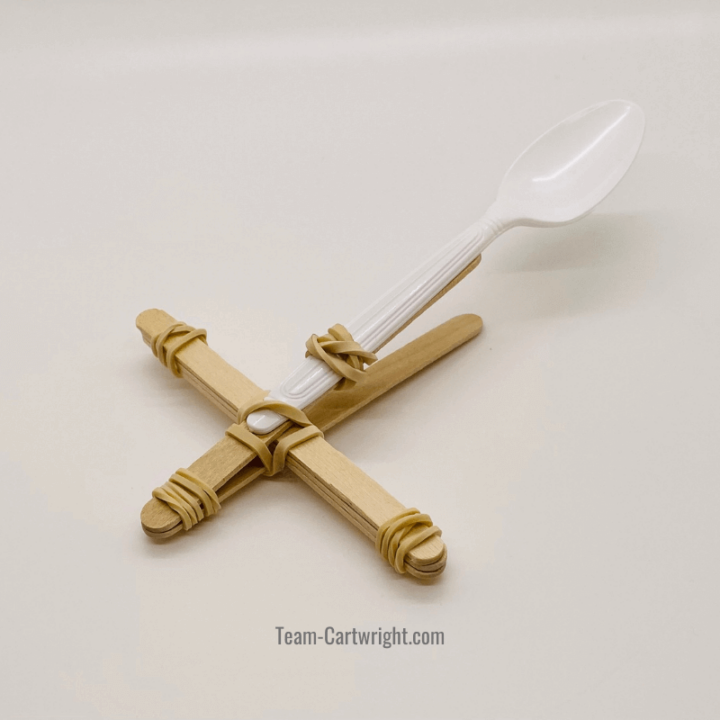
- Plastic Spoon
- Puff Balls, Mini Marshmallows, Pom Poms, or Small Plastic Ball
If you don’t have any of these items, don’t worry. I’ll give some alternatives to them further down.
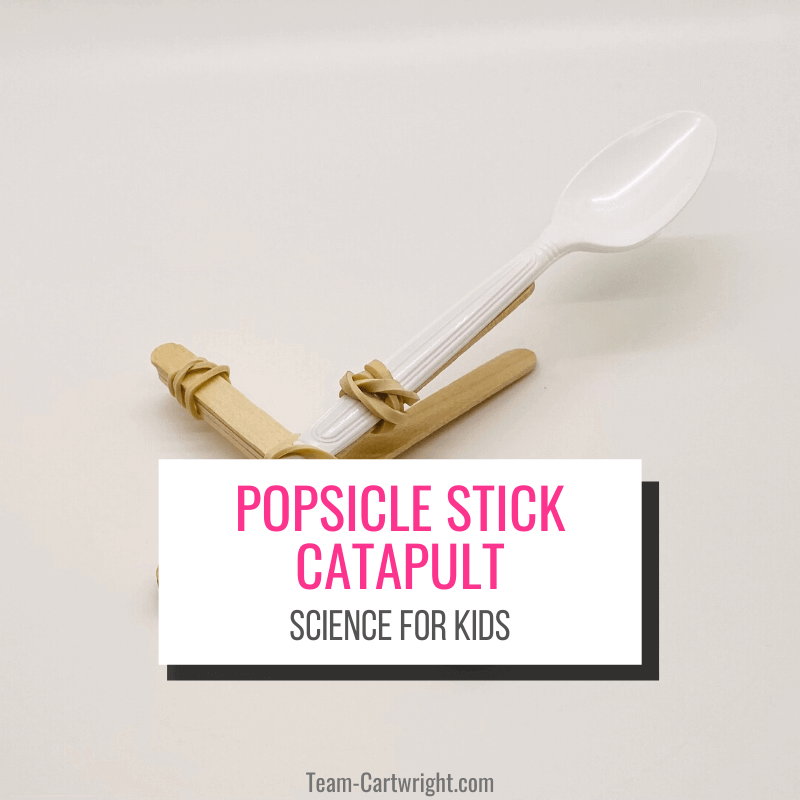
How To Make Your Popsicle Stick Catapult
This catapult is easier to make than you might think. That being said, it is a good idea to have an adult nearby because their fingers tend to be a little stronger and a bit steadier.
Step 1: Place 3 sticks on top of each other and wrap each end in a rubber band to hold them together.
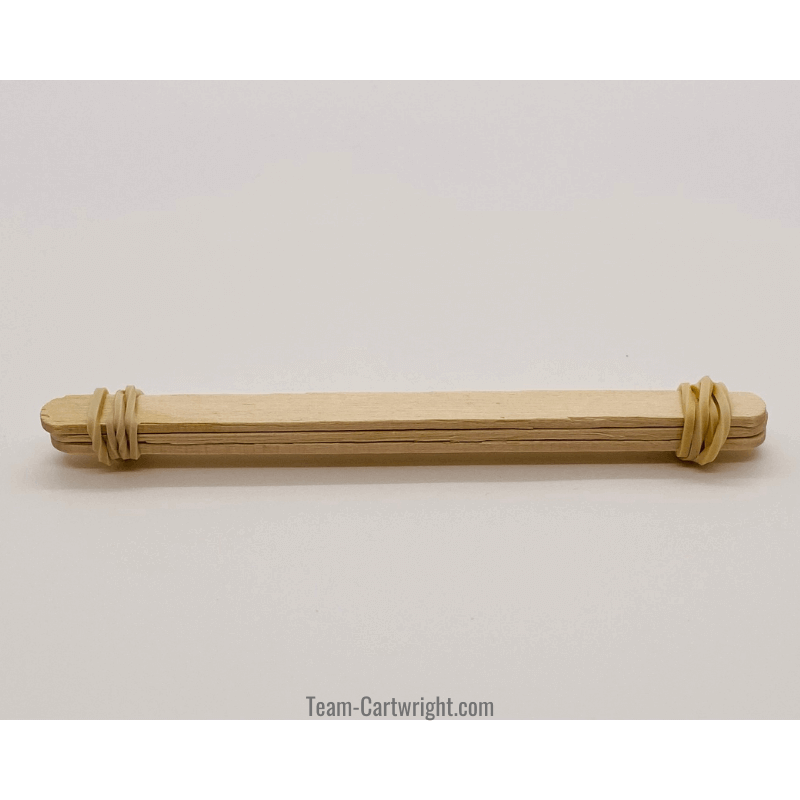
Step 2: Take the remaining two sticks and put one on top of the other. Wrap one end in a rubber band to hold that end together.
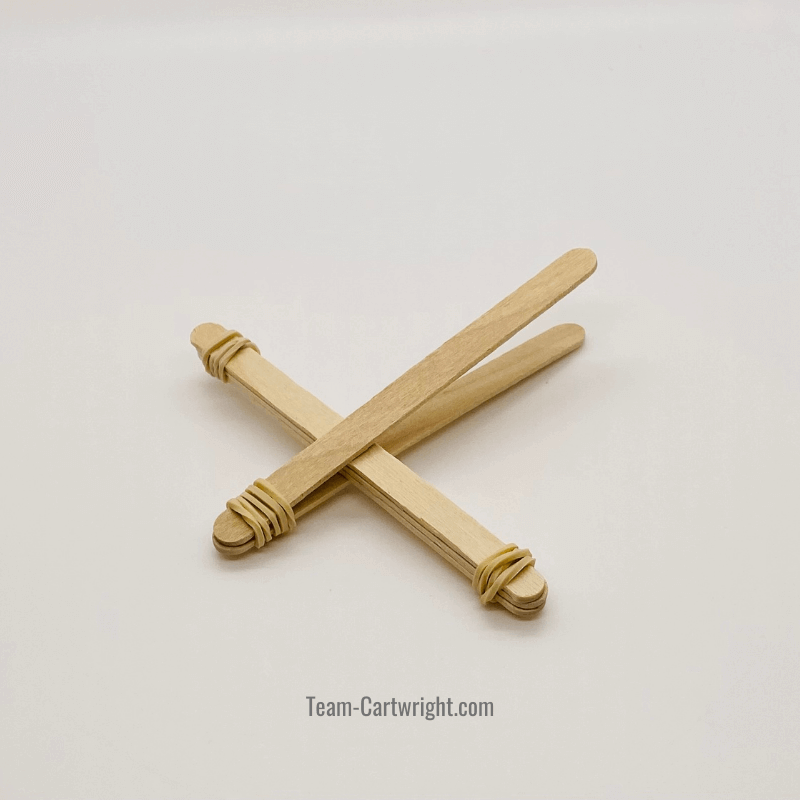
Step 3: Take the double stack of sticks and hold open the end without a rubber band. Take the other bundle of popsicle sticks and place it between the two open sticks as far as they can go. Wrap a rubber band around the two pieces so that the sticks stay in place.
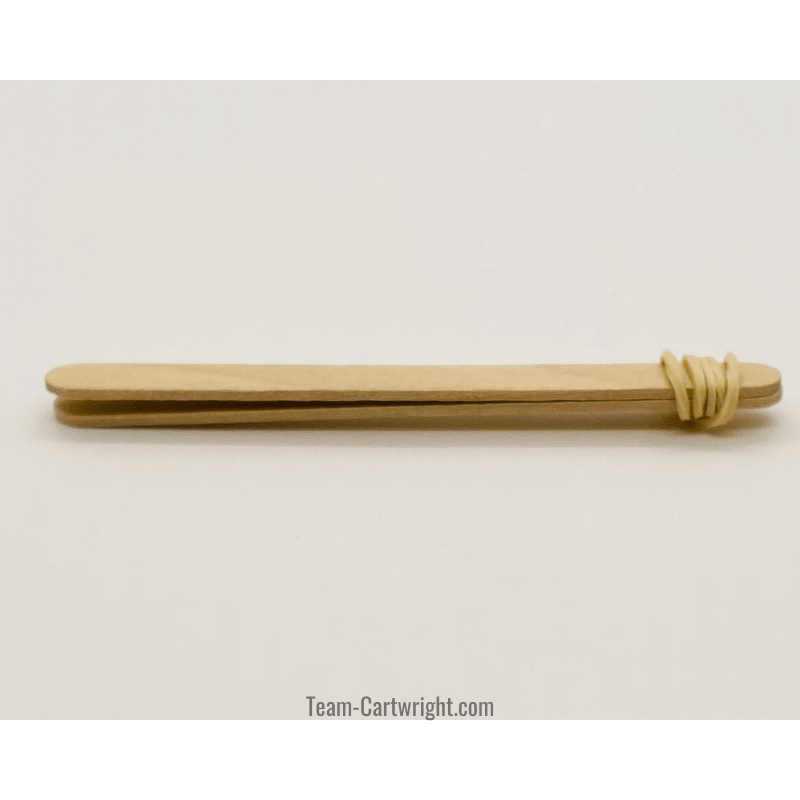
Step 4: Take your plastic spoon and line it up with the top stick of the two that are only attached at one end. The spoon part should be at the open end. Use your remaining rubber bands to secure the spoon in place.

Step 5: Place a mini marshmallow or puffball into the spoon, gently pull it back while supporting the base, and let it fly!
Here are more fun activities you have got to try.
Alternative Material Suggestions
DIY popsicle stick catapults are a great STEM activity because you can make them with so many different items. Seriously, a simple popsicle stick catapult design can be made with so many household items. You can make this work.
Use a Spork
No plastic spoons around? No problem, you can use a spork and it works just fine. How do I know this? Because I’ve had to do it. Even a fork can work pretty well.
It is okay if your STEM project doesn’t look perfect. In fact, it is a valuable learning experience for your children to see you adapt and improvise. That’s what scientists do.
Use a Cap
Instead of using a spoon, you can also take a bottle cap from an orange juice or a milk jug. Glue the lid on the end of your catapult and place your puffball there to launch.
This way works pretty well. I prefer using a spoon because it gives a little more stability and helps the balls fly further, but both ways work.
Safety
This is a pretty safe activity, but it is important to remember you are creating a projectile. Even with small, soft items children need to be taught how to use them properly.
Do not launch anything at anyone’s face and especially their eyes. Make sure children aim away from their own faces.
Make sure your child understands that rubber bands can snap back if you aren’t careful. (And even if you are.) Chances are that won’t cause major injuries, but it can really hurt to be snapped by a rubber band, especially if it is unexpected.
Check out these other fun science activities!
The Science of Catapults
Launching things through the air is fun. Yes, it is important to be careful when we do it, but it’s still fun. That makes it perfect to get kids excited about the science behind it. They are already fascinated, just slip in some fun facts.
How Do Catapults Work?
Catapults are a great way to explain energy to kids. They work by storing up potential energy, then changing that into kinetic energy which sends the projectile flying.
That’s the short version of how catapults work. Let’s get into a few more details.
What Is Potential Energy?
Potential energy is the stored energy in an object. It is there due to the object’s position or due to the state it is in.
Potential energy isn’t the energy of motion, it is energy that is waiting to happen. When you pull the spoon and stick back and hold it in place, that is the potential energy stored up.
What Is Kinetic Energy?
Kinetic energy is the energy of motion. Once the spoon is released and starts moving back to its original position, that is kinetic energy.
Kinetic Energy vs Potential Energy
So how do potential energy and kinetic energy work together?
A good example is to think of a ball on top of a ramp. While it is just sitting on top of the ramp and not moving it has potential energy. It has this potential energy because of its position, it could roll down the ramp.
Once the ball starts rolling that potential energy is converted to kinetic energy. Kinetic energy is the energy of motion. As it starts rolling faster, it gains kinetic energy and loses potential energy.
In our catapult we pull back the spoon, giving it potential energy. Once we let go the spoon starts moving and gains kinetic energy, and this is what causes your projectile to fly through the air.
Conservation of Energy
Conservation of Energy tells us that energy can not be created or destroyed, but it can be changed from one form to another.
This helps explain further how the catapult turns being pulled back into forward motion. The potential energy and the kinetic energy always add to the same total energy.
When the catapult is pulled back, the ball has all potential energy. It is not moving, so it does not have any kinetic energy. Once we let go, the ball moves and goes flying. It has kinetic energy that grows as the potential energy decreases. No new energy is created, it simply changes form.
(Note: Things like friction and air resistance cause projectiles to slow down. This is not because they are losing energy. That energy is changing from the kinetic energy moving the ball into friction and resistance. Total energy is still conserved.)
Key STEM Vocabulary
Here is a recap of the key vocabulary to introduce and explore in this experiment.
- Potential Energy: Potential energy is stored energy.
- Kinetic Energy: Kinetic energy is the energy of motion.
- Conservation of Energy: This is the law that energy is neither created nor destroyed. It does change forms.
- Catapult: A catapult is a ballistic device used to launch a projectile without the use of gunpowder.
Catapult Fun Facts
Catapults have been around for a long time. Here are some fun facts about them to share with your child.
- The catapult was invented in Greece in 400 BCE by Dionysius the Elder of Syracuse. (reference)
- The biggest human catapult is the Nevis Catapult in New Zealand. It launches people 150 meters. That’s almost 500 feet! (reference)
- There are several historical catapult designs: the mangonel, onager, ballista, and trebuchet. (reference)
- There are 3 different types of motion that make catapults work. Tension, which is like the catapult we made. There is also torsion and gravity. (reference)
- Catapults were originally used as military weapons. They are less effective than more modern weapons and therefore not used any longer for this purpose.
Additional Fun Challenges
Simply shooting puff balls around is a ton of fun, but there are a few additional challenges and science experiments you can do with your simple catapult.
Target Practice
Pick a target to aim at. Now try to hit it.
This sounds really easy to do, but it can be tough! For littles, this can be especially challenging as they try to aim and hold the catapult. (You might want to help hold it down for them.) They can also try picking up the catapult to aim it, and this works fine motor skills as they manipulate the craft stick catapult.
Again, keep safety in mind, and don’t aim your projectiles at anyone. Even a soft puffball can hurt if it hits your eye.
Height Challenge
Who can send their projectile the highest?
This is a fun contest because you don’t have to worry about aim, so it is a little easier to try out. Plus seeing how high you can launch something is just fun.
Try pulling your catapult back just a little bit, then try doing it a lot. Which goes higher? What if you pull it back quickly compared to holding it down?
Next, try different projectiles. Does a heavier plastic ball go higher than a pom pom? How does a marshmallow compare? These are great ways to get your little scientist into experimenting. And by asking leading questions you can help them make hypotheses and practice the scientific method.
Distance Challenge
Who can send it the furthest?
This is just like the height challenge, but you see how far you can launch something. Try getting out a measuring tape and check your distance!
Be sure to try different projectiles here as well and keep an eye on safety.
Craft Stick Catapult Fun
This engineering challenge is fun for kids of all ages. Yes, even adults like launching things. That makes this STEM activity perfect for family fun or with friends.
When are you going to get started?

Popsicle Stick Catapult Printable Directions
How To Make a Popsicle Stick Catapult
Make an easy, fun popsicle stick catapult! This is a great STEM challenge for kids. They practice engineering problem-solving skills and learn about potential and kinetic energy.
Materials
- Popsicle Sticks
- Rubber Bands
- Plastic Spoon
- Puff Balls, Pom Poms, Mini Marshmallows, or Small Plastic Ball
Instructions
- Take 3 popsicle sticks and stack them. Wrap a rubber band around each end to secure them in place.
- Take the other 2 craft sticks and stack them. Wrap a rubber band around one end to secure them in place.
- Gently open the bundle of two sticks and slide the bundle of 3 sticks as far in between as possible. Use a rubber band to secure the sticks in place.
- Take your plastic spoon and place it along the top stick of the 2 stick bundle (now held apart by the other sticks). Use a rubber band to hold it in place.
- Place your projectile in the basin of the spoon. Gently pull back the spoon then let go to use your launcher!
Notes
Safety
This is a pretty safe activity, but you are creating projectiles. Make sure you do not aim it at anyone, specifically anyone's face or eyes.