How to build a working lung model for kids.
Let’s talk breathing. We all need to do it. Fortunately, most of us do it without even thinking. But how exactly does it work?
Learning about the body is a great way to get kids interesting in science. Why? They have bodies, so really you are learning all about them. And kids generally like to learn about themselves.
Learning about how we breathe and specifically how our lungs work is a good starting place too because it is something they can readily experience. They breathe. They get it. (This is the same reason we made a pumping heart model.)
So let’s make a working lung model that will teach kids how our lungs work. It’s easier than you think.
What's In This Post?
How To Make a Working Lung Model
So why make a lung model? Well, as I said, it is something very clear for kids to understand even at a young age. It can be hard to understand what the liver or pancreas does. But the lungs we can actively experience.
So before you get started have your child take a few deep breaths with you. Encourage them to feel their chests expand with the breath. Can the feel the air moving through their mouth or nose?
(This is also good practice as a calming technique.)
Now that we have done that, let’s build our model.
(And be sure to check out all the interactive anatomy activities: Anatomy Activities for Kids!)
Supplies for a Working Lung Model
You don’t need anything fancy for this model. Just a few at home items.
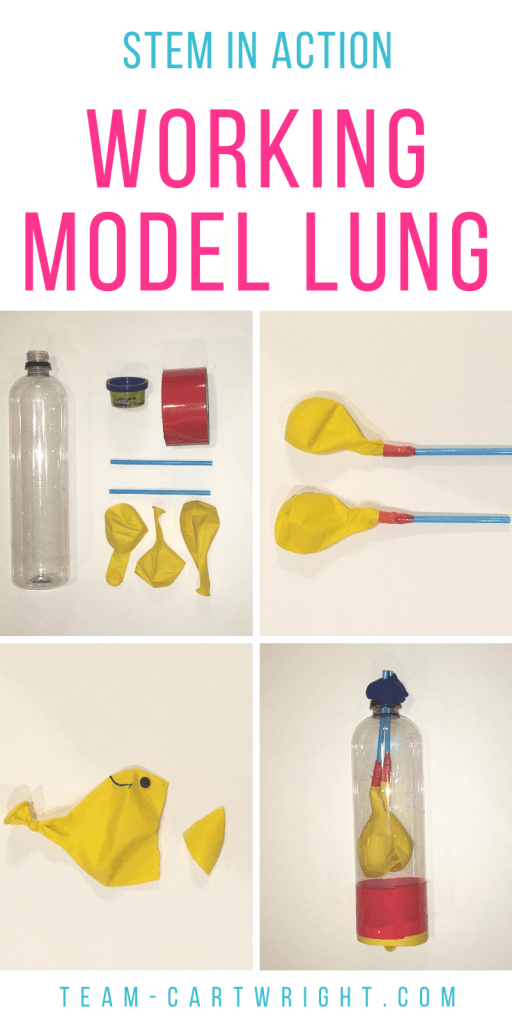
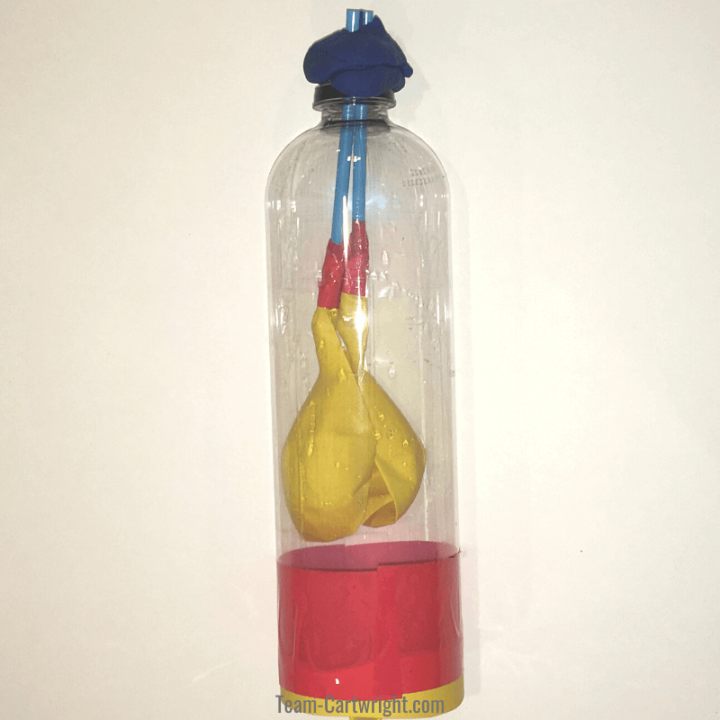
- 1 Empty one liter bottle
- 3 Balloons
- 2 Straws
- Tape (preferably duct tape or packing tape)
- Play-Doh or Clay
How To Build Your Lung Model
Step 1:
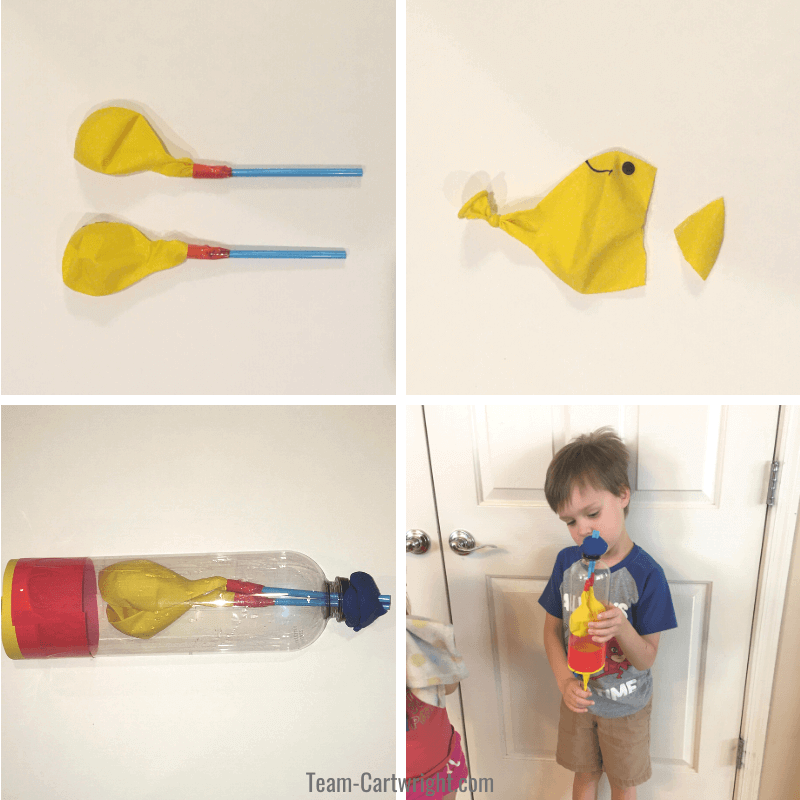
Tape the end of a balloon around one end of each straw. Make sure the balloons are tightly in place.
Step 2:
Cut the bottom off of your empty 1 liter bottle.
Put the two straws into the bottle with the balloon end inside the bottle and the other end of the straws sticking out through the neck of the bottle.
Use your play-doh or clay to hold the straws sticking out the top in place. You don’t want any air to be able to get through except what comes through the straws.
Step 3:
Tie the opening of the 3rd balloon and cut the top part off.
Take this balloon and stretch the cut opening over the opening at the bottom of the 1 liter. You’ll have to be careful with this step because it can be a little hard to stretch the balloon into place. (It’s not a bad idea to have back up balloons for this part.)
Tape this balloon tightly into place.
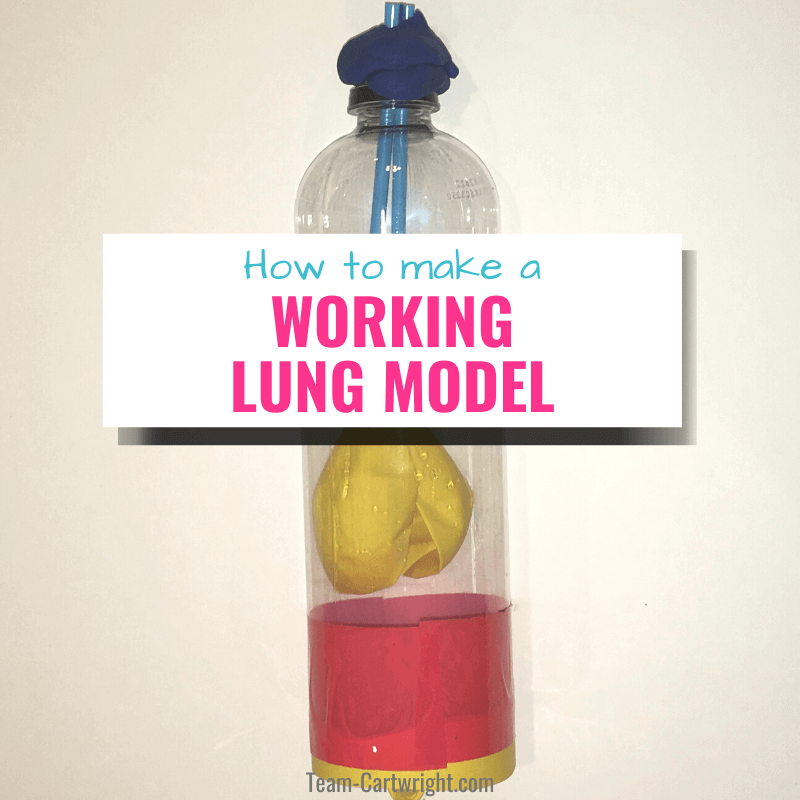
How To Use Your Lung Model
Once you have your model put together you are ready to use it! It’s really simple.
Pull back on the balloon taped to the bottom of the bottle. As you do so the two balloons inside the bottle will start to inflate!
When you gently release the balloon the two balloons inside will deflate. You are making your model breathe!
More Human Body STEM Activities
What is Happening Here? (The Science Part)
When we inhale, our diaphragm moves down, and this is what draws air into our lungs. When we exhale, the diaphragm moves back up and the air is pushed back our of our lungs.
In our model that we made the two inside balloons are our lungs (we have two of them), and the balloon you pull on is the diaphragm.
More Activities Your Kids Will Love
Lung Facts and Information for Kids
Our lungs are the organs that help us get oxygen into our bodies. We get it from the air around us. Our lungs also help us eliminate carbon dioxide, a waste product, from our bodies.
But breathing has more to it than just our lungs. Here are the basics of how breathing works.
Mouth and Nose
We take in our through our mouths and nose. They have mucus and your nose specifically has tiny hairs that help filter out dust and other things we don’t want to breathe in.
Sinuses
Attached to your nose and your sinuses. These help regulate the temperature and humidity of the air you are breathing in. These, along with the hairs in your nose, make nose breathing the preferred way to breathe. But the mouth works too.
Trachea
Once through your nose/mouth and throat, the air enters your trachea. This is the tube that takes it to the bronchial passages of the lungs.
Bronchial Tubes
Your bronchial tubes bring the air into the lobes of the lungs. (The right lung has 3 lobes and the left lung has 2 lobes.)
Your bronchial tubes are lined with mucus and cilia. (Cilia are like teeny tiny hairs.) These work together to collect and dust or icky stuff that you might breathe in and get them out of your lungs.
Alveoli
The alveoli are tiny air sacs inside your lungs. These are where the actual transfer of oxygen and carbon dioxide takes place.
Printable Lung Model Instructions
You can print out the instructions to make this lung model at home to make it even easier!
And click here for more fun lung facts for kids!
How To Make a Working Lung Model
Teach your kids how we breathe by making this simple lung model that really works! All you need are a few household items.
Materials
- 3 Balloons
- 2 Straws
- 1 Empty 1-Liter Bottle
- Clay or Play Doh
- Packing Tape or Duct Tape
Tools
- Scissors
- Knife
Instructions
Putting together this lung model isn't too hard, but it might need some parental help with younger children.
How To Build Your Lung Model
- Place one straw into the opening of one balloon. Tape it into place tightly. Repeat with the second straw and balloon.
- Cut the bottom off the 1-liter bottle.
- Place the straws and balloons inside the 1-liter. The balloons should be down towards the bottom of the bottle with the opposite ends of the straws sticking out the top of the bottle.
- Use the clay or play-doh to secure the straws into place at the top of the bottle. You want the only air that comes through the bottle to come through the straws.
- Take the final balloon and tie the end as you would if it was inflated. Cut the top part off. Put this open part over the opening in the bottom of the 1-liter bottle. Use the packing tape to tape it in place.
How To Use Your Lung Model
- Gently pull down on the balloon at the bottom of the bottle. The balloons inside should start to inflate. This is the inhale process.
- Gently release the balloon you are holding and watch the balloons inside the bottle deflate. This is the exhale process.
Notes
Safety:
An adult should be the one cutting the bottom off the bottle. The easiest way to do it is with a knife, so safety first. Be careful.
Tips:
The easiest way to get the balloon onto the bottom of the bottle is to have your tape ready to go. Have one person hold the b
bottle while the other person gets the balloon in place and tapes it.
If the bottom of your bottle rips the balloon, line the edge with tape and try again with a new balloon.
Happy lung building!

More Must Try STEM!